Saturday, May 31, 2014

Easy herb garden!


So I finally decided to give myself a mini herb garden on the side of my shed! Super excited to share with you what I did and how great it turned out! 

 What I needed for this project: 
Old pots for planting 
rust oleum paint for the pots + tire
12'x12" Board of treated wood (menards) 
Four 12" brackets to hold shelf 
An old tire 

For the big shelf:
1. we decided to go with treated one early because it's sitting outside and it prevents the wood from decaying. 
2. To start this project you need to find the studs inside the shed or use a stud finder just to secure the brackets that hold the shelf.  
3. Place the secure the brackets with screws of your choice we chose longer screws to ensure a stable shelf. 
4. Lay the wood in top and screw the bottom of the shelf to the bracket. 
5. Paint: we chose Rust Oleum white paint (not spray) because this is a big price of wood and spray doesn't properly cover the area.  
6. Finish it off with a gloss topcoat! 


The pots: 
 We grabbed a bunch of old pots laying around our house they happen to be different colors so we decided to grab a can of Rustoleum spray!  this was a very quick fix and it turned out great! 

Here is a close up of exactly what I planted in the pots! 


The tire:  
For this quick project with Grafton Alkire from the shot and cleaned it off by hosing it down with water. After I had left over deglosser from another project and rubbed it on and left to cure for about 20 mins. After I placed it on a ladder to spray.  


then we hung it using a bracket!  

 
This was my inspiration! Much more to come :)

Swing revamp!


The Hey everyone finally decided to revamp my old swing we had laying out! It's a super quick fix and could just cost a few cans of paint!  


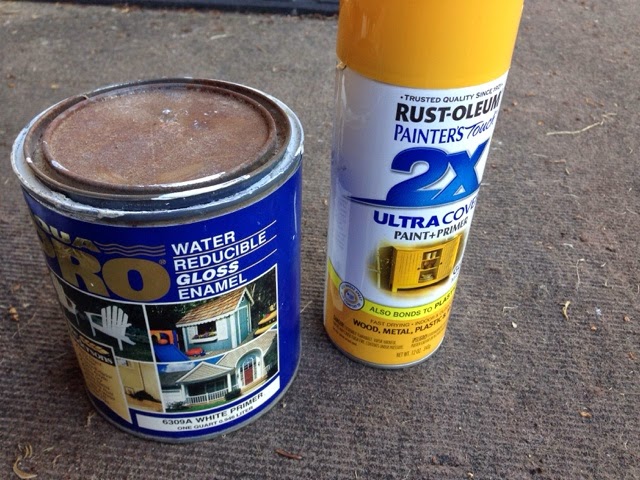
This is the before just used these two: 

The first is a primer to give the old wood a smoother finish. You could also sand prior to priming. 
The second is a spray by rust oleum. I really like this one only because it contains a primer for better coverage. 

Note: Since I am painting over an old would slab it could be very porous so priming prior to spray painting ensures a great finished product! 

This is after my prime and paint! 

I am going to replace the chains and paint the frame! Stay tuned! 

Monday, March 10, 2014

Best kitkat cake ever!!


hey everyone!  
Been a while since I posted but I deff had to share a VERY easy and inexpensive cake to make! looks chic and delish! 


Let's get started! 
What you will need 
1-1 pkg white cake 
2- 1 pkg of milk chocolate cake  
3- marshmallow creame. 
4- 4 large king size kitkats 
5- milk chocolate frosting 
6- strawberries (you may sub for anything! ) 

Step uno: prepare cake batter according to directions fill a circular baking pan (detachable sides) half white and half chocolate and bake.


Step Dos: next use a bread knife to slowly cut in half and spreas creame.  


Step tres: Cool cake down and apply a thin layer of frosting! Becareful Ensure it is fully chilleed. Attach kitkat (break into twos) that way you minimize the gaps! 


Enjoy! add any tipping! 
Tips I covers with plastic before hand and added strawberries day before even! Keeping inside in room temperature allows the cake to stay cook and moist make sure it's covered so the cookies don't become stale!


Monday, February 10, 2014

Diy Flower Centerpiece

To go add a hint if elegance and warmth I  decided to create an easy and affordable center piece for my dinette room (still in process). Let's begin! 


What you will need: 
*Vase (I used a glass pitcher from Bed bath and beyond) $14.99 
*Flowers (Hobby lobby) purchased mine during 50% off promo on floral 
*(2) Packets of Pete Moss (dollar tree) 
*Wirecutters 
*Foam (Dollar tree or hobby lobby) 
*Ribbon (optional)   


hint: remember you could be creative choose other colors or even different types if flowers just be sure to stagger them. 

Step 1: lay out your material and arrange he flowers in your hand to get an idea what length will best fit each stem. 

Step 2: cut and insert foam to the bottom of your desired base.   


Step 4: cut your stems (hard part). Remember the center of each stem is a thick wire, you CANNOT cut right through   unless you use clippers with a ratcheting mechanism. Bend your stem all the way to one side then all the way to the opposite side. begin to cut at the crease  and then slowly attack the wire center. Hopefully it should twist off.   


Step 5: Cover the sides and cracks with peat miss, do NOT fill all the way until all your stems are in place. Now arrange your stems.  Do not place close togather, you could crack the foam in half. If you have too many holes, replace your base.
Hint: for the thicker stems score the outer plastic portion and pull off, this will reduce the amount of space each stem will take up. 


Step 6: Top off with peat moss ensuring all corners and foam edges are concealed. Wrap your base with a ribbon of your choice and bond with no sew fabric glue or a hot glue gun.  


Monday, February 3, 2014

Strawberry Banana Triffle

We all love to satisfy our taste buds! well most of us do alreast and I am one of those people! This was definitely the talk of a superbowl party I hosted Sunday! I made this Saturday! 

Ingredients: 
Triffle glass bowl 
Pound cake sliced 
strawberries (as many as you like) 
1 package of vanilla pudding 
1 can of sweetened condensed milk 
3+ Bananas (preferably ripe) 
1 tub of cool whip  

Step one: Prep 
Wash your hands and your fruit! 
Begin by cutting up your strawberries (add some sugar for sweetness optional)
Combine coolwhip and condensed milk in a bowl set aside 
Slice bananas (LAST since they brown up) 


Step two: layer 
Follow these steps and repeat 
-pound cake chunks 
-pudding 
-coolwhip mixture 
-strawberries and bananas 
-repeat once then too with blackberries!

step three: Wait! 
Allow a good 12-24 hours of refrigeration you could eat it sooner but the longer it sits the better it will taste! (pound cake will absorb the pudding) 
enjoy!!

Wednesday, January 29, 2014

Kitchen Table Transformation

So after celebrating my husband agreeing to me transforming the room if began to do my research! 
my inspiration: 

Yes found it on Pinterest! These retail $700+ as a set and $400 table alone, clearly I didn't have that much money for my entire room makeover! Plan B goodwill, Salvation Army & craigslist! my goal was to find a solid wood table that could be restained and painted! 

After 3 days of nonstop phone calls and research I came across table on craigslist! it was ONLY $50!!!!!

I had to have it, just like a little kid in a toy store! I saw so much potential I couldn't wait to get started!  
what you will need: 
patience (maybe a prayer or 2 haha)
Power Sander (coarse,medium,&fine grain paper)  
Liquid Deglosser 
Stain 
Spray paint 
Sealer (top coat must be glossy) 
wax (very end)  

Step 1: The top
Notice: Sander applies to stained surfaces ONLY, if you decide to paint with a solid color...SKIP THIS STEP
What a pain in my rear end this was, years of overlapped stain on the top gave it a splotchy look! I tired a strip (bad idea), then decided to go with old fashion sanding. Went to my dad's house and stole his sander (sorry dad) haha! First go over it with the coarse then medium and last fine to ensure an extra smooth surface.   

step 2: the bottom 
Since I just wanted to paint over the existing stain I chose a deglosser! Why? it's super easy and takes off the shine so the paint better adheres to the surface. (same as a sander) 

Pour the liquid onto a clean cloth and generously spread onto the surface. Allow 30 min dry time, if you wait more than an hour you will have to reapply this process requires immediate action.  
once it's dry wear your mask and spray away! (Shake well and do light even coats, to avoid drips)  Then apply your top coat (water friendly highly recommended because it will be INDOORS and will eventually be cleaned) 
cover the base with a clean flat sheet or old towels and let's move on! 

step 3: back to the top! 
Last but not least, time to stain the top! clean off the surface with a damp rag to remove and dust or debris! I used sponge tipped brushes and a flag resealable Tupperware (turkey bologna packaging!
 dip your brush and use even strokes! your goal is to not overlap, and not have drip marks dry in between. 
finally apply top coat (mandatory) and wax after the top is dry for added shine (optional) it allows for easier cleanup!  

I did not wax only because I chose to add a glass top to mine! found it on craigslist for $30 with drop off!  


It fit like a glove! I for once felt so accomplished it was the best feeling in the world! plus the entire project cost $90 (I had old spray cans and deglosser)   


will post the final picture once the room is completed! 

Sunday, January 26, 2014

Wedding day in a nutshell

I'm feeling very project happy! Two posts in one day (pat on my back)! Alright everyone here's a great way to cherish one of the most life changing snd happiest days (I hope) haha. 

Brace your selves...ready? 
My Wedding Collage


This was very fun to make all you need is:
-boxed frame (tj maxx)  
-string 
-hammer & nails
-your wedding invite 
-few straight pins 
-pictures  
-jewelry 
-and anything else sentimental 
-oh and your imagination 😊 
Tj Max Finds

First: Organize 
seperate all your belongings into categories. (ie, pictures, jewelry, pins, scrapbook paper, sayings etc.) 

Second: Arrange 
Arrange your items to your liking, your goal is to create a story. 
**Tip, Clutter free is the way to go you want the person to be able to clearly see every aspect.  

Third: Pin 
pin all your goodies so when held upward everything is secured. 
** less is more! the less pins the better, again this goes with the clutter free goal. Arrange your artifacts so they overlap around corners so instead of pinning one thing you hit a few! 

Fourth: Hang 
Attach a string to create an easy hang  frame. Usually with lighter frames I use yarn and with heavier frames I use wire! both work great! 

Fifth: Your done! 
Just hang and enjoy! 
Added a string to the back


 I placed this in my bedroom along with a few other details to really add more to the story! !  

Loved how it turned out!
Take two!


Hope this helps! would love to see what you've done! Also appreciate and value your feedback! Pin and hashtag your frame #inspiredbyannae